Here are some fun and easy things you can do at home with your kids. We’ll keep adding to this page, so come back often.
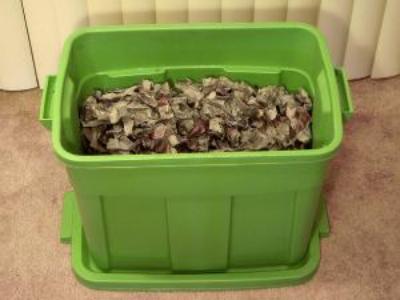
Worm Bin
Worm composters are simple to build and easy to manage. Your worms can convert 5–6 pounds of food scraps a week into 10–15 gallons of compost a year.
Materials:
- Storage box, dark plastic, 10-20gal in volume
- Lids (2), for box
- Newspapers
- Soil, from the garden, 1 quart
- Water, 1 gallon
- Red wiggler worms (Eisenia Fetida)
- Tape, brightly colored
- Popsicle sticks (2)
Original Instructions from Make Magazine
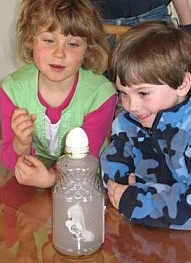
Egg in a Bottle
Adult supervision Required!
Materials:
- Clean, dry wide mouthed glass milk or juice bottle
- Peeled hard boiled egg that’s a little bigger than the jar’s mouth
- Matches
- A few strips of paper to light w/ matches
Experiment:
The object is to get the egg into the bottle without harming the egg.
- Start by smearing some water around the mouth of the bottle.
- Have the adult light a match and set the strip of paper on fire. Quickly put the burning strip into the bottle. Be careful not to accidentally burn your fingers.
- Immediately cover the mouth of the bottle with the egg. In just seconds, the fire will go out, and some invisible force will literally “push” the egg into the bottle. That’s amazing!
Why?
Hot air expands. Cold air contracts. When the air inside the bottle is heated, the molecules, or tiny air particles, inside the bottle spread out, increasing air pressure. As the air in the bottle cools, the air pressure decreases. The greater outside air pressure pushes the egg into the bottle. Blowing into the bottle raises the air pressure again. The air and the egg rush out of the bottle.
OK, let’s get it back out. Wash the ashes out of the bottle. Turn it upside down and position the egg with the pointy end back in the opening. Take a deep breath and blow in. Continue to hold the bottle upside down, wait and watch.
Straw Oboe
Materials:
- Drinking straw
- Scissors
What to do:
- Flatten one end of the straw by sticking it in your mouth and biting down with your teeth, and pulling it out. Do this a several time to make a flexible flat-ended straw.
- Cut equal pieces of the straw from each side of the flat region so that the straw has two lips at the end.
- Put the straw in your mouth and bite down gently with your front teeth just beyond the lips of the straw.
- Experiment with blowing hard and softly while biting down with different amounts of pressure until you make the straw sing.
What’s happening:
When you blow, a pulse of compressed air flows down the straw. The pulse travels down the straw at Mach 1, the speed of sound, and bounces off the distant open end.
When the sound bounces off the open end, the compressed air changes into a low-pressure expansion. When the expanded air reaches the lips of the straw, they are forced closed – then bounce open to admit more air. The sound bounces back and forth inside the straw and the lips of the straw open and close to create a sound.
And for some new sounds:
Try making the straw shorter Make holes in your straw like a flute
Find another straw that can fit inside of your oboe. Pull it in and out like a trombone. Roll a piece of paper into a cone and tape the cone onto the end of the straw to make a straw oboe with a bell. The bell makes less sound bounce off the end of the straw so that more sound goes out into the air. This makes the sound much louder.
Adapted from: https://www.exploratorium.edu
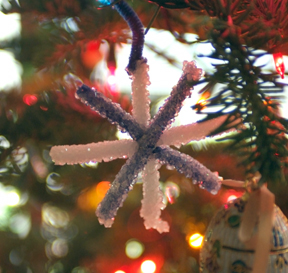
Borax Crystals
Materials:
- Beaker or a wide-mouth jar
- String
- Colorful pipe cleaners
- Pencil
- Boiling water
- Borax (20 Mule Team Borax Laundry Booster)
Directions:
- Cut and bend pipe cleaners into desired shape. It should easily fit into the jar you have with a least 1/2 inch of space all around. Pipe cleaners form a base for the crystals to grow in.
- Now, attach string to the top of one of the pipe cleaners and tie the other end to a pencil (this is to hang it from). Remember that the crystals will also form on the string, so place it somewhere that it will still look nice.
- Fill a wide-mouth jar with boiling water. (measure how much you put in!)
- Mix borax into the water one tablespoon at a time. Use three tablespoons of borax per cup of water.
- Stir until dissolved, (don’t worry if there is powder settling on the bottom of the jar).
- Insert your pipe cleaner shape into the jar so that the pencil is resting on the lip of the jar and the snowflake is freely suspended in the borax solution. It should be completely submerged and not touch sides or bottom.
- Wait overnight and by morning the shape will be covered with shiny crystals.
- Hang in a window as a sun-catcher or use as a decoration.
The Science Behind the Fun
Borax is an example of crystal – “a solid with flat sides and a symmetrical shape because its molecules are arranged in a unique, repeating pattern.”
Every crystal has a repeating pattern based on it’s unique shape. They may be big or little, but they all have the same “shape”. Salt, sugar, and Epsom salts are all examples of crystals. Salt crystals are always cube-shaped while snow crystals form a six-sided structure.
How do the Borax crystals grow?
Hot water holds more borax crystals than cold water. That’s because heated water molecules move farther apart, making room for more of the borax crystals to dissolve. When no more of the solution can be dissolved, you have reached saturation. As this solution cools, the water molecules move closer together again. Now there’s less room for the solution to hold onto as much of the dissolved borax. Crystals begin to form and build on one another as the water lets go of the excess and evaporates.
This also applies to snowflakes – As water cools the molecules move closer together. Since all water molecules are shaped the same (H2O) they align in a six sided crystal.
Cabbage “Soup”
Materials:
- adult helper
- small head of red cabbage
- grater
- strainer
- 2 large bowls
- very warm water enough to cover the cabbage in a bowl
- 2 or more clear containers
- white vinegar
- baking soda
- other foods to test such as lemon, soda, water, or yogurt
Experiment:
- Have an adult cut the cabbage in half. Coarsely grate 1 cup of cabbage into a large bowl.
- Pour enough warm water to barely cover the cabbage.
- Leave the cabbage mixture until the water turns purple.
- Pour the cabbage mixture into a strainer over another large bowl. Save the cabbage water in a jar for your experiments.
- Put ¼ cup of cabbage water into a clear container and add spoonfuls of vinegar. What color does it turn?
- Put ¼ cup of cabbage water into another clear container and add some baking soda, a teaspoon at a time. What color does it turn?
- Try testing foods and other things from your kitchen to see if they make the cabbage water change color.
Why?
The purple cabbage juice became blue-green when you added baking soda. Baking soda is a base. When you added vinegar it became pink. Vinegar is an acid. Acids and bases are a group of chemicals. Acids have certain things in common with each other while bases also have certain things in common. Acids, or foods containing acids, taste sour while bases taste bitter. Some acids and bases are too dangerous to taste so we test them in another way. You’ve made an indicator form red cabbage that tests some chemicals for us.
Experiment and info from “Kitchen Science” by Shar Levine and Leslie Johnston
Bean Power
- Materials:
- a package of dry beans (any kind will do)
- a drinking glass
- water
- a metal cookie sheet or cake pan
Experiment:
Fill the glass full of dry beans. Add enough water to fill it to the top, and place the glass in the center of the metal pan. Put it somewhere nearby, where it won’t be in the way, and then go about your daily routine.
After a few hours, you will hear a clink as one of the beans falls out of the glass onto the pan. Then you will hear another. Over the next few hours, you will continue to hear the sounds of the beans falling, so unless you are a heavy sleeper, don’t try this at night. (And of course you would never hide your experiment in your sister’s closet before bedtime!) You will find that the beans expand to more than twice their original size.
Why?
Why does that happen? The dry beans absorb the water to start the process of sprouting. The water softens the cells, and is absorbed into them by the process of osmosis. This causes the cells to expand, making the beans larger.
When you are finished, use your pre-soaked beans to make a tasty bean dish in your slow cooker. The internet has some great recipes to try! Let us know what your favorite one is.
Invisible Message
Materials:
- adult helper to cut the lemon
- lemon
- 2 cotton swabs or 2 paint brushes
- paper
- red cabbage water(from previous experiment)
Experiment:
Have an adult cut the lemon in half. This is your ink.
Dip the end of the cotton swab, paint brush or your finger into the “ink” and use it write a secret message or draw a picture onto a piece of paper.
Let the juice dry. The paper will look blank.
Take a clean cotton swab or paintbrush and dip it into some red cabbage water. Paint it over the lemon writing.
Why?
Red cabbage juice is an indicator that is used to test acids and bases. The acid in the lemon juice reacted to the cabbage juice and changed color so you could see your message.
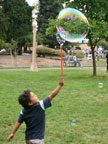
Bubble Juice
Materials:
- 1 gallon water (distilled works best)
- 9 oz Ultra Dawn
- 3 Tbsp. glycerin
- or
- 15 to 1 water to Dawn
- 3 Tbsp glycerin
We’ve used both and they work well. They’re basically the same measurements but the 9 oz of Dawn is an actual size you can buy. There are 16 cups to a gallon so the 2nd recipe will better fit in a gallon container.
Sidewalk Chalk
Materials:
- Plaster of Paris – it’s important that it is “Plaster of Paris” and not a wall patch compound
- Water – follow directions on plaster package
- Large plastic bowl or bucket – a large plastic yogurt container would work great
- Stirring stick (paint stick)
- Liquid watercolor or tempera paint (powdered or liquid) – food coloring can work but might be more prone to staining the surface you are drawing on
- Small container for molding the chalk (good examples you can use: paper cups, paper egg cartons, toilet paper tubes reinforced with duct tape)
- Rubber gloves
- Adult help for mixing plaster
What to do:
- Protect your work area and your clothes. Working outside is best. Cover the table with plastic and wear “get messy” clothes. Put on those gloves.
- Mix water and plaster together according to the directions on the package.
- Immediately stir in enough coloring to get desired result without changing the consistency of the plaster too much.
- Pour plaster into containers (cups, egg cartons, etc.)
- The chalk won’t be completely dry for a day; however, if you just can’t wait that long, it can be used after about 15-20 minutes.
- Agree on a drawing area with any adults involved. Use your new chalk and draw a picture!
Seed Paper
Materials:
- Newspaper- about 3-4 strips will make one small piece of seed paper
- Bucket or bowl large enough to soak newspaper
- Clear and clean squeeze bottle (A recycled ketchup bottle works well)
- Deckle – Please refer to “How to Make a Deckle” instructions below
- Drain bucket (e.g.: deep dish, cookie sheet, or another household item that will help keep your work surface dry.)
- Small Seeds
- Sponge
- Cookie cutters (optional)
What to do:
- Tear newspaper into strips and soak in a bucket of water overnight. Each piece of seed paper only requires a few small strips of newspaper. A little goes a long way.
- Place the deckle over the top of the drain bucket with the fiberglass screen facing up.
- If needed, cut the tip of the squeeze bottle so it allows the paper pulp and seeds to come out. You may need to play around with the size of the hole to make it work for you.
- Add a few pieces of soaked newspaper to the squeeze bottle.
- Add about a ¼ tsp. of seeds to the squeeze bottle. You can mix and match seeds.
- Fill the bottle about a ¼ of the way with water.
- Put the cap on, cover the hole with your finger, and shake.
- Once the newspaper fibers have broken apart, you can squeeze the seeded pulp onto your deckle.
- If you are using cookie cutters, place one on the deckle. Squeeze all of the seeded paper pulp into the cookie cutter or directly onto the deckle if you’re not using a cookie cutter.
- Let it drain slightly. Place a sponge over the top and press down to squeeze out the excess water. The paper may stick to the sponge but will come off when peeled. The shape will also be squashed. You may want to let it dry for a little while in the cookie cutter if you want it to keep its shape. Remove the cutter before the pulp completely dries so it doesn’t stick to the edges of the cookie cutter. If the paper won’t come free of the screen, you can gently tap it upside down until the paper comes loose. You can also try peeling it away from the screen with your fingers.
Crayon Cookies
Don’t throw out those old crayons! Make beautiful “new” crayons out of the old nubs that nobody want to use anymore. These crayon cookies are also a great chubby size for younger children to hold and use.
Materials:
- Old crayon nubs
- Metal cupcake tin: Find a used one at the thrift store and spare your good cookware
- Lots of fingers for peeling the wrappers from the nubs
- Oven
- Adult help for oven use
What to do:
- Peel all of those crayons! It’s a lot of work and might be hard for tiny fingers. If you plan ahead, you can peel a good handful everyday in the days leading up to your activity.
- Have an adult preheat the oven to 300°F.
- Fill the cupcake tin cups at least halfway with whatever colors you want. This is a good time to think about how colors mix and change. You may not want red and green mixing to make brown and maybe you do
- With adult help, put the tin into the oven. You may want to place foil under the tin in case of spills.
- Let the crayons melt slowly. This could take about 10-15 minutes or more. Melting them too hot, too fast will make the colors mix more thoroughly. Melting them slowly will allow the crayons to remain somewhat separated as they melt. This will make the crayons have a different colored streaking effect when used. If greater mixing of colors is desired, have an adult help mix the melted wax with a toothpick.
- When the crayons look completely melted, take them out of the oven and let them cool for a few minutes before putting the tin in the freezer for about 15-20 minutes to cool and harden completely.
- When they are cool and hardened, the crayon cookies are done and ready to use. Just pop them out of the tray and start coloring!
Here are a couple of ideas:
Place drawing paper over various textures and rub away. Use coins, leaves, benches, trees, sidewalks, raised letters on signage, anything that you think will make a cool pattern.
By changing sides of the crayons, you will get different colors almost every time!
What are you going to color?
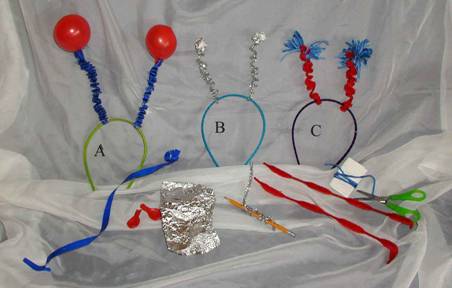
Bug Antenna
by Alice Tucker
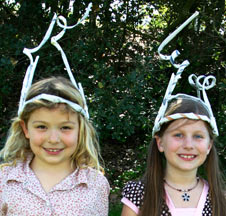
Head Sculpture
by Lisa Fredenthal-Lee
Thank you to Alice and Lisa, two very talented craft designers, for lending us their fabulous ideas!
Check out their websites for more fabulous ideas!
Famous
This list was researched and created for us by Kristyn Byrne for our Time To Wonder fundraising event held on September 23, 2010. Each scientist was used as a table marker. Although having names of scientists as table markers caused a bit of confusion, people overwhelmingly loved reading about the creative inventions and asked to have copies of the list to take home. Here’s the list for all to enjoy.
1 Marion Donovan As a mother, Marion wondered what it would be like to not have to wash dirty, leaky, cloth diapers. Her curiosity inspired her to create the first convenient disposable diaper.
2 Chester Greenwood When Chester was a boy, he wondered how he could keep his ears warm while ice skating. At just 15 years old, his curiosity inspired him to create the first earmuffs.
3 Margaret Knight Working in a paper bag factory, Margaret wondered how we could transport our shopping purchases more effectively. Her curiosity revolutionized the grocery industry when she created a machine to make flat-bottom paper bags.
4 Ronald Kay When Ronald was a boy, he wondered how we could better protect our kids from getting into trouble. His curiosity inspired him to create the child-proof medicine cap.
5 Earle Dickson When his wife kept cutting her fingers while preparing food in the kitchen, Earle set out to design a solution for active fingers. His curiosity inspired him to create Band-Aids.
6 Thomas Adams While working on a project to convert the chicle from sasaparilla trees into synthetic rubber projects, Thomas popped a piece into him mouth. Liking the taste, his curiosity inspired him to add flavor to create chewing gum.
7 Arthur Wynne When Arthur was a boy, he wondered if he could make a brainteaser that would appeal to the masses. His curiosity inspired him to create the first crossword puzzle.
8 Captain Hanson Crockett Gregory While working on a ship at age 16, Hanson wondered if he could make a non-greasy, fried cake that didn’t give him indigestion aboard his ship. His curiosity led him to use a tin can to cut a hole in the cake before frying it, creating the first donut.
9 Alfred Carlton Gilbert While commuting from New Haven to New York on the train, Alfred watched the workers building a power-line tower. Based on miniature versions of the same steal beams the workers were using, his curiosity inspired him to create a construction set for children and called it the Erector Set.
10 George W. Ferris As a bridge builder at an engineer’s banquet, George overheard the desire to have something built for the World’s Fair in Chicago that would rival the Eiffel Tower. After sketching an idea on a dinner napkin, his curiosity inspired him to design and create the Ferris Wheel.